More and more about NS-2

NIST Wimax patch for NS-2.31

Download: NS-2.31 + NIST Wimax patch

Article obtained from: http://bestkid.pixnet.net/blog/post/15075795

Install ns-allinone-2.31

1. download ns-allinone-2.31 http://sourceforge.net/project/showfiles.php?group_id=149743&package_id=169689

2. Move ns-allinone-2.31.tar.gz to C:\cygwin\home\user

3. Start cygwin , tar zxvf ns-allinone-2.31.tar.gz

4. cd ns-allinone-2.31

5. ./install

6. Modify .bashrc file of C:\cygwin\home\user by inserting the following at the end of the file:

export NS_HOME=`pwd`/ns-allinone-2.31

export PATH=$NS_HOME/tcl8.4.14/unix:$NS_HOME/tk8.4.14/unix:$NS_HOME/bin:$NS_HOME/ns-2.31:$PATH

export LD_LIBRARY_PATH=$NS_HOME/tcl8.4.14/unix:$NS_HOME/tk8.4.14/unix:$NS_HOME/otcl-1.13:$NS_HOME/lib:$LD_LIBRARY_PATH

export TCL_LIBRARY=$NS_HOME/tcl8.4.14/library


7. after exit cygwin , restart cygwin ,with the command: ns , to test if ns install successfully.


Install wimax module and ns-2.31 patch

1. Can be downloaded from the blog or obtained from http://w3.antd.nist.gov/seamlessandsecure.shtml | Software Tools

Note: contains patch for ns-2.31. See documentation for the list of modifications. Use the request form to download the file.

The downloaded file is ns-nist-wimax.tgz
Copy the file to C:\cygwin\home\user

2. Start cygwin then unpacked the tarball with command: tar zxvf ns-nist-wimax.tgz

3. Then, with command: tar zxvf prerelease041707.tgz
After decompress completed, you will find patch-ns-2.31-041707 patch file.

4. Copy patch-ns-2.31-041707 to C:\cygwin\home\user\ns-allinone-2.31 folder

5. cd ns-allinone-2.31

6. patch -p0
patch-ns-2.31-041707.patch

Read More......

Accelerate NS-2 scheduler

Download: Scheduler-patch

This is a patch that can speed up the NS-2 scheduler by improving the Calendar Queue data structure in the scheduler. Especially, it can help to speed up many simulations with high speed long distance network. Some simulations that need one day with the original NS2 scheduler can now be finished in an hour.

  1. Copy the patch to ns-allinone-2.28/ns-2.28 (or ns-2.29)
  2. In the directory of ns-allinone-2.28/ns-2.28 (or ns-2.29) , run: make clean
  3. In the directory of ns-allinone-2.28/ns-2.28 (or ns-2.29), run: patch -p1 <>
  4. (Optional) delete the patch file by rm ns-scheduler.patch
  5. recompile the ns2 by make and make install


Many thanks to the author: David X. Wei

Read More......

Error: nam: command not found

Solution:
In nam directory (inside the ns-allinone)use the following command:
./configure and make

When compiling, you would encounter a series of errors. Erase for example, "abc::" from file and
in the line with error could solve the problem.
By solving all the errors, you could execute nam with the command:
nam

Read More......

Error free NIST mobility NS2.29 installation

Download: patch_nist_mobility

Download: ns-nist-mob.tgz

1. Extract the patch and insert the patch file in ns-2.29 folder.
2. Patch the folder with the command:
patch -p1 -i ns2_NIST_mobility.patch
3. Compile the whole ns-2.29 with the command:
./install

Special thanks to Mr Johann M. Márquez Barja for providing the patch.
***************************************************************
To install NIST mobility....
II- Version
This source files provided is for ns-2.29.


III- Installation
The mobility package is a complete ns-2.29 directory, not a patch.
Unzip and untar the source file:
tar -zxf ns-nist-mob.tgz
this will extract another compressedf file to unzip and untar:
tar -zxf ns-2.29-nist-mob-022707.tgz (this will uncompress a complete ns-2.29 directory)

Note: we have a generic name (ns-nist-mob.tgz) for download purposes. This file contains a compressed file with the release date to better keep track of the different versions.


IV- Compilation options
After extracting the ns-2.29 directory, you need to recompile the code. To do so, execute "make clean; ./configure ; make" in the ns-2.29 directory.
To debug the wimax code, edit the Makefile and add the -DDEBUG_WIMAX switch in the DEFINE entry.


V- Running examples
Examples of scenarios using homogeneous and heterogeneous handovers are located in the tcl/hsntg directory.
The scripts have been updated to run properly.

Read More......

To Save and Exit in "vi" Command - Linux

Esc, then shift+ctrl+":" and then "wq", enter.

Read More......

Learning C++

Due to NS-2 is heavily coded in C++, I am currently studying hard about it. My knowledge in C++ is really limited. Arghh... Feel like I have been wasting a lot of time of doing "don't know what"... I want to GRADUATE!!!!

Read More......

Actual Coverage Range in NS-2

Actual Coverage Range = square of 2*distInterference_centred in the reception node

PS: Information extracted from mailing list. Hopefully will be useful in later work.

Read More......

Installing INET Framework into OMNET++

Download: Inet Framework
Download: Inetmanet Framework

To install:
You should have a working OMNeT++ installation, version 4.0 or later.
It must be compiled with dynamic NED loading enabled (WITH_NETBUILDER=yes setting).

1. Make sure your OMNeT++ installation works OK (e.g. try running the samples)
and it is in the path (to test, try the command "which nedtool").

2. Change to the INET directory.

3. Type "make" to build the inet executable (debug version). Use "make MODE=release" to build release version.

Problem:
-lpcap is not found

Solution:
yum install libpcap-devel

Problem:
make: warning: Clock skew detected. Your build may be incomplete.

Solution:

   cd directory
# Remove output files
make clean
# Put timestamps on all files equal to current time
find . -exec touch {} \;
# Rebuild all output files
make

Finally, try running the demo simulations. Change into examples/ and type
"./rundemo".

Problem:
Error during startup: Cannot load library '../../../src//libinet.so': ../../../src//libinet.so: cannot open shared object file: No such file or directory.

For INET:
Solution:
SELinux blocks the library from running. Free the library with the command:
chcon -t textrel_shlib_t '/home/user/inet/out/gcc-debug/src/libinet.so'

For INETMANET:
The problem occurs due to "makefile"

1. Copy everything from "Makefile_dll" and replace all of "Makefile"

2. Execute "buildMakefiles" shell file with the command: sh buildMakefiles

3. Finally, compile with the command: make

4. You probably need this as last step:
chcon -t textrel_shlib_t '/home/user/inetmanet/out/gcc-debug/src/libinet.so'

Then you should be able to run the demo in the examples;
./rundemo

Read More......

Subversion of NS-MIRACLE+NS-MIRACLE 2.0 Beta

Download the latest NSMIRACLE: Subversion NS-MIRACLE

Download Beta version: NS-MIRACLE 2.0 Beta

The NS-MIRACLE codebase is kept on a subversion repository. In particular, the development version of nsmiracle is available at this URL:

https://telecom.dei.unipd.it:/tlcrepos/nsmiracle-dev/trunk

The above mentioned subversion repository provides read-only access for guest users using the following account:


username: nsmiracle-dev-guest
password: nsmiracleguest

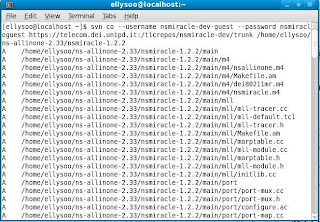
As an example, using the svn command line client you can check out the latest development version using the guest account by typing the following command and add in the path to be copied to at the trail of the command:


svn co --username nsmiracle-dev-guest --password nsmiracleguest https://telecom.dei.unipd.it:/tlcrepos/nsmiracle-dev/trunk /home/username/nsmiraclerep


NSMIRACLE SVN repository Installation procedures:

1. Go to the "main" directory
command:
cd main
2. Execute the autogen.sh
command:
sh autogen.sh
3. Configure script will be generated and do the following:
command:
./configure --with-ns-allinone=/home/username/ns-allinone-2.33 --prefix=/home/username --disable-static --with-dei80211mr=/home/username/ns-allinone-2.33/dei80211mr-1.1.4
4. command:
make
5. command:
make install

NSMIRACLE ADDONS installation procedure:
1. Go to the "addons" directory and access to the addon need to be install
command:
cd addons
cd addontobeinstall
2. Execute the autogen.sh
command:
sh autogen.sh
3. Configure script will be generated and do the following:
command:
./configure --with-ns-allinone=/home/username/ns-allinone-2.33 --prefix=/home/username --disable-static --with-nsmiracle=/home/username/nsmiracledir/main
4. command:
make
5. command:
make install

PS:
Error occured during "./configure" of addons:
1. configure: error: Could not find boost graph header files, please install the boost graph library.
Solution:
yum install -y boost-devel
yum install boost

Error occured during "make" of addons:
1. error:
/usr/include/boost/pending/relaxed_heap.hpp:102: error: 'CHAR_BIT' was not declared in this scope
Solution:
This is a bug in the standard header. Apparently, an include of is missing in that header. Adding the following header to the problematic code fix the problem.

#include // for CHAR_BIT

Read More......

Installing NS-MIRACLE to NS-2.33

Download: NS-MIRACLE-1.2.2
Download: Paper on NS-MIRACLE-1.2.2

NS-MIRACLE: Multi-InteRfAce Cross-Layer Extension library for the Network Simulator

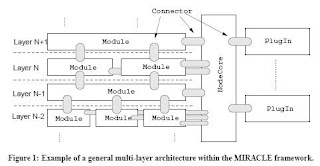
NS-MIRACLE is a set of libraries designed to enhance the functionalities provided by the Network Simulator ns2. It provides an efficient and embedded engine for handling cross-layer messages and, at the same time, enables the coexistance of multiple modules within each layer of the protocol stack. For instance, multiple IP, link layers, MACs or physical layers can be specified and used within the same node. The NS-MIRACLE framework facilitates the implementation and the simulation of modern communication systems in ns2; moreover, due to its modularity, the code will be portable, re-usable and extensible.


Installation of NS-MIRACLE:

1. Unpack the nsmiracle package at /home/username and cd into the newly created directory:
Command:
tar xzf nsmiracle-1.2.2.tar.gz
cd nsmiracle-1.2.2

2. In the /nsmiracle-1.2.2, do the following:
Command:
./configure --with-ns-allinone=/home/username/ns-allinone-2.33 --prefix=/home/username --disable-static --with-dei80211mr=/home/username/ns-allinone-2.33/dei80211mr-1.1.4

3. After that, execute as following:
Command:
make
make install

4. Lastly, check that your installed NS-MIRACLE is working by running the example found in /home/username/nsmiracle-1.2.2/samples
Command:
cd samples
ns link_with_errors_cbr.tcl

You should get the result as shown if NS-MIRACLE is installed successfully:
Simulating........................................done!
Packet Error Ratio : 0.050000
Throughput : 68360.897567
Tracefile : /tmp/link_with_errors_cbr.tcl.tr


NOTE:
  • remember to adapt all paths to your needs, unless you're using /home/username.
  • make sure that the tests run by ./configure have been successful, in particular the tests for ns-allinone
  • after running make install, make sure that the path in which library have been installed is in your LD_LIBRARY_PATH environment variable.
Ref. page: http://telecom.dei.unipd.it/pages/read/58/

Read More......

Install OMNET++ 4.0 at FEDORA 10

Download:

Pre-installation:
Install the items in the following list in FEDORA 10. You must be 'root' to execute the following command:

yum install tcl
yum install tcl-devel
yum install tk
yum install tk-devel
yum install blt
yum install gcc
yum install gcc-c++
yum install byacc
yum install bison
yum install flex
yum install make
yum install swig
yum install zlib-devel
yum install java-1.6.0-openjdk-plugin
yum install automake
yum install autoconf

Installation of OMNET++ 4.0:

Download the source package and copy the omnetpp file to where you want to install it.
Extract the package by the command:
tar zxvf omnetpp-4.0rc2-src.tgz

Add the following line to your startup file (.bashrc or .bash_profile):
export PATH=$PATH:~/omnetpp-4.0/bin export LD_LIBRARY_PATH=$LD_LIBRARY_PATH:~/omnetpp-4.0/lib

Access into the newly created directory:
cd omnetpp-4.0

Install with command:
./configure

Locate .bash_profile (eg. /home/user/.bash_profile) and include the following line into it:
export TCL_LIBRARY=/usr/share/tcl8.5

After that, at the omnetpp-4.0 directory too, type this command:
make

After compilation completed, you can try the samples, for eg:
cd ~/omnetpp-4.0/samples/dyna
./dyna

To start omnet++ IDE, use the command:
omnetpp

Read More......

My current dilemma....

I am using NS-MIRACLE, the extension of NS-2 in order to create multi technology nodes. My intention is to create nodes with two interfaces, which are UMTS interface and WLAN interface respectively.

For long I have been analyzing the sample codes in NS-MIRACLE, but still I am unable to create my dual interface nodes yet. HELP!~~ @ @

Read More......

Prevent FEDORA 10 from always log out

Check your screensaver setting:
system|preferences|look and feel|screensaver|untick all

Check your power management setting:
system|preferences|system|power management|On AC power, set to never for all

Read More......

Set the screen resolution of FEDORA 10 in VMWARE

Change by doing the following at FEDORA 10
system| preferences| hardware| screen resolution

and choose your desire resolution, then click "apply" and "ok".

Read More......

Installing NS-2 in Fedora 10

Download: ns-allinone-2.33

I have used VMWARE with Fedora 10 to install NS-2 for my convenience. The steps are as below:

Pre-installation NS-2:
1. Make sure FEDORA 10 is updated completely at the autoupdate.
2. Have the following install at TERMINAL. You must be the "root" to do this:
yum install autoconf
yum install automake
yum install gcc-c++
yum install libX11-devel
yum install xorg-x11-proto-devel
yum install libXt-devel
yum install libXmu-devel
yum install tk
yum install tcl
yum install make
yum install perl
yum install gnuplot


Installation for NS-2 in FEDORA 10:
1. Unzipped NS-2.33 file:
tar -xvzf ns-allinone-2.33.tar.gz
2. Go into ns-2.33 directory:
cd ns-allinone-2.33
3. Install ns-2.33
./install
4. Set environment:
gedit ~/.bashrc

Replace the following to your .bashrc file, double check your own installation path and version. Set the environment at "cd /home/username" as a user and not the "root":

# .bashrc

# Source global definitions
if [ -f /etc/bashrc ]; then
. /etc/bashrc
fi

# User specific aliases and functions

# LD_LIBRARY_PATH
OTCL_LIB=/home/ellysoo/ns-allinone-2.33/otcl-1.13
NS2_LIB=/home/ellysoo/ns-allinone-2.33/lib
X11_LIB=/ellysoo/X11R6/lib
USR_LOCAL_LIB=/home/ellysoo/lib
export LD_LIBRARY_PATH=$LD_LIBRARY_PATH:$OTCL_LIB:$NS2_LIB:$X11_LIB:$USR_LOCAL_LIB


# TCL_LIBRARY
TCL_LIB=/home/ellysoo/ns-allinone-2.33/tcl8.4.18/library
USR_LIB=/ellysoo/lib
export TCL_LIBRARY=$TCL_LIB:$USR_LIB

# PATH
XGRAPH=/home/ellysoo/ns-allinone-2.33/bin:/home/ellysoo/ns-allinone-2.33/tcl8.4.18/unix:/home/ellysoo/ns-allinone-2.33/tk8.4.18/unix
NS=/home/ellysoo/ns-allinone-2.33/ns-2.33/
NAM=/home/ellysoo/ns-allinone-2.33/nam-1.13/
PATH=$PATH:$XGRAPH:$NS:$NAM

5. If your environment is set properly, you should be able to run the command "ns" and get the result "%".

6. Validate your ns as followed:
./validate

Read More......

Run NSG2 in FEDORA 10

1. Yum install java-1.6.0-openjdk-plugin
2. At the directory of NSG2, type the command: java -jar NSG2.1.jar

Read More......

VMX file to allow VMWARE to detect USB driver

Open your vmware vmx file with notepad and replace all as below and make sure the filename is same as your filename inside the same folder:

Download: VMX File

#!/usr/bin/vmware

.encoding = "UTF-8"

config.version = "8"

virtualHW.version = "4"

scsi0.present = "TRUE"

scsi0.virtualDev = "lsilogic"

memsize = "256"

scsi0:0.present = "TRUE"

scsi0:0.fileName = "fedora-10-i386.vmdk"

ide1:0.present = "TRUE"

ide1:0.fileName = "auto detect"

ide1:0.deviceType = "cdrom-raw"

floppy0.startConnected = "FALSE"

floppy0.fileName = "/dev/fd0"

ethernet0.present = "TRUE"

ethernet0.connectionType = "nat"

ethernet0.wakeOnPcktRcv = "FALSE"

roamingVM.exitBehavior = "go"

displayName = "Fedora10"

guestOS = "other26xlinux"

nvram = "fedora-10-i386.nvram"

virtualHW.productCompatibility = "esx"

ft.secondary0.enabled = "TRUE"

tools.upgrade.policy = "useGlobal"

# PowerOn/Off options

gui.powerOnAtStartup = "FALSE"

gui.fullScreenAtPowerOn = "TRUE"

gui.exitAtPowerOff = "TRUE"

# USB settings

# This config activates USB

usb.present = "TRUE"

usb.generic.autoconnect = "TRUE"

# Optional second serial port, physical COM2 is not available

serial1.present = "FALSE"

# First parallell port, physical LPT1 is available

parallel0.present = "TRUE"

parallel0.fileName = "Auto Detect"

parallel0.autodetect = "TRUE"

parallel0.bidirectional = "TRUE"

# Sound settings

sound.present = "TRUE"

sound.fileName = "-1"

sound.autodetect = "TRUE"

# Other default settings

#svga.autodetect = "TRUE"

svga.maxWidth=1280

svga.maxHeight=1024

mks.keyboardFilter = "allow"

snapshot.action = "autoCommit"

extendedConfigFile = "fedora-10-i386.vmxf"

ethernet0.addressType = "generated"

uuid.location = "56 4d b4 d1 71 51 96 7f-92 5a e6 00 a7 63 44 b1"

uuid.bios = "56 4d b4 d1 71 51 96 7f-92 5a e6 00 a7 63 44 b1"

scsi0:0.redo = ""

vmotion.checkpointFBSize = "16777216"

ethernet0.generatedAddress = "00:0c:29:63:44:b1"

ethernet0.generatedAddressOffset = "0"

tools.remindInstall = "FALSE"

ide1:0.autodetect = "TRUE"

floppy0.autodetect = "TRUE"

checkpoint.vmState = "fedora-10-i386.vmss"

tools.syncTime = "FALSE"

isolation.tools.hgfs.disable = "FALSE"

usb.autoConnect.device0 = ""

parallel0.startConnected = "FALSE"

Read More......

Installing Tracegraph in Fedora 10 with NS-2

As referred to: http://ns-2.blogspot.com

I have followed the steps below for Tracegraph installation:
Download Tracegraph for linux: Tracegraph202
Download Matlab for tracegraph: Matlab
Download my .bashrc file: .bashrc

Installation instructions on Linux:
1)Download tracegraph and mglinstaller from the webpage
Check Trace graph download page: http://www.tracegraph.com/download.html
Choose Linux version and download mglinstaller.
2) At the directory where you save the tracegraph and mglinstaller.
Command: tar -xvzf tracegraph202.linux.tar.gz
3) Command: gunzip mglinstaller.gz
4) Command: sh mglinstaller
5) When asking for location folder, set /home/user1/mgl as the location
6) set the environment path variable by
Command: gedit ~/.bashrc
In .bashrc file, add in the following:
export LD_LIBRARY_PATH=$LD_LIBRARY_PATH:/home/user1/mgl/bin/glnx86
7) Check the environment,
Command: printenv LD_LIBRARY_PATH
8) Go to directory /home/user1/Tracegraph202 and run trgraph.
Command: ./trgraph


Errors encounter when installing:
1) ./trgraph: error while loading shared libraries: libmwcl.so: cannot open shared object file: No such file or directory

Solution: LD_LIBRARY_PATH is not defined properly. Check with printenv and set the environment again.

2) ./trgraph: error while loading shared libraries: libXp.so.6: cannot open shared object file: No such file or directory

solution: yum install libXp.so.6


Installation instructions on Windows:
1)Download tracegraph and mglinstaller from the page make sure it is windows version http://www.tracegraph.com/download.html
2)unzip tracegraph202.zip to say, D:\
3)execute mglinstaller.exe, when it asks for directory name, enter D:\tracegraph202
4) add D:\tracegraph202\bin\win32 to your environment PATH
5)how to add to environment PATH??
right click on Mycomputer and select properties
From properties select Advanced tab
Select environment path variables
Select PATH and add your path to it
Thats it tracegraph is now ready!!
This is the procedure i followed while installing tracegraph on both windows and linux (if you dont have matlab installed on your machine.)

Read More......

Refresh my mind on NAM error in FEDORA 10

Download: Patch

Error when executing nam in Fedora 10 terminal:
nam:
[code omitted because of length]
: no event type or button # or keysym
while executing
"bind Listbox {
%W yview scroll [expr {- (%D / 120) * 4}] units
}"
invoked from within
"if {[tk windowingsystem] eq "classic" || [tk windowingsystem] eq "aqua"} {
bind Listbox {
%W yview scroll [expr {- (%D)}] units
}
bind Li..."


After installing Fedora 10 with NS-2 two months back, the solution seems to have been faded from my mind. Totally cannot recall. Now my friend is having this error, yet I have forgotten how to solve it. Should have record all the solution here for reference last time but I have started this blog kinda late. Hope will soon find the solution and definitely will update in here this time!

Solution:

  1. Extract tk-8.4.18-tkBind.patch from the downloaded patch.zip.
  2. Put the file in ns-allinone-2.33 folder and in the same directory patch with the command: patch -p0 <>
  3. Finally, compile the ns-2 again with the command: ./install
PS: For my case, I have to be the "root" so that ./install will compile my ns-2 completely.

OR
  1. Extract tk-8.4-lastevent.patch from downloaded patch.zip.
  2. Put the file in tk8.4.18 folder and in the same directory as the patch and type with the command: patch -p1 < ./tk-8.4-lastevent.patch
  3. File to patch: generic/tk.h
  4. Finally, compile the ns-2 again at ns-allinone-2.33 directory with the command : ./install

Read More......

NSG-2 : Java based NS-2 scenarios generator

Download: NSG2.1

What is NSG2?

NS2 Scenarios Generator 2(NSG2) is a JAVA based ns2 scenarios generator. Since NSG2 is written by JAVA language, you can run NSG on any platform. NSG2 is capable of generating both wired and wireless TCL scripts for ns2. Some major functions of NSG2 are listed below:

1. Creating wired and wireless nodes

2. Creating connection between nodes

3. Creating links (Duplex-Link and Simplex-Link)

4. Creating agents (TCP and UDP)

5. Creating applications (CBR and FTP)

6. Node movement

The link of the site is: http://sites.google.com/site/pengjungwu/nsg

Read More......

A simple demo with jTrana

Thanks to Weiwei Fang, the developer of jTrana, for providing us this demo:

Download the demo here (in MS-Word):
A Simple Demo

Download the slides here (PowerPoint):
Jtrana Slides


Read More......

Steps to install jTrana

Download: Java
Download: jTrana
Download: Mysql5.1.30-32bits

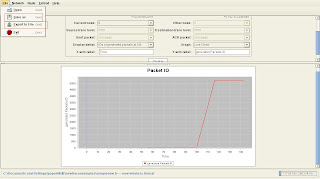
JTrana is a java-based NS2 Wireless Trace Analyzer. You can use it to analyse the NS2 wireless simulation traces.

What can jTrana do?
Network related: Overall information, Energy remained for the whole network, Packet statistics.
Nodes Related: Current selected node info, packets id, throughput, energy, sequence number, delay, RTT, Movement
Custom function: Get the data from the MySQL database using SQL-like script and get the results.

Special thanks to Nancy for supplying me the installers which have saved my time a lot from downloading with the campus snail speed internet access.

Software needed:


Here are the steps recorded down when I am installing jTrana:

1. Make sure your Windows (Windows XP Pro, in my case) has Java supported, if not, install Java first.

2. Then, install mysql ( my filename is: mysql-5.1.30-win32.zip). Follow the guidelines from Larry Kahm: www.heliotropicsystems.com/pubs/TSa092005.pdf

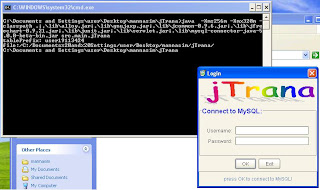
3. Next click on jTRANA file, namely run.bat. Login as root with the password set during mysql installation. Below is the login page of jTrana upon successful installation:

Read More......

Creating your own routing protocols in NS-2

Download Protoname source code: PROTONAME

Just went through ip-tech.blogspot and happened to read on his post about creating own protocols. This information is really helpful to me, hopefully by reading the guideline in "Implementing a New Unicast routing Protocol in NS2", I would able to write my own routing protocols soon.

Download "Implementing a New Unicast routing Protocol in NS2" here:
http://masimum.dif.um.es/nsrt-howto/pdf/nsrt-howto.pdf

Read More......

First touch on NS-2

Download: NS-2.33

After done some literature review, since like NS-2 would be the best network simulation tool in my research. As most people have used it all this time. Therefore, I have tried to install the latest NS-2.33 in cygwin because my operating system is in Windows XP (in Virtual PC).

Here are the steps to install NS-2 in virtual pc with cygwin:

Download virtual PC here:
http://www.microsoft.com/downloads/details.aspx?FamilyID=04d26402-3199-48a3-afa2-2dc0b40a73b6&displaylang=en

Download Window XP OS for virtual PC here:
http://www.microsoft.com/downloads/details.aspx?FamilyID=21eabb90-958f-4b64-b5f1-73d0a413c8ef&DisplayLang=en

Download Cygwin here:
http://www.cygwin.com/

Download latest NS-2 here:
http://sourceforge.net/projects/nsnam/

With all these downloaded, you are all set to go to install NS-2 in your virtual pc.
If the link is broken, you may just search for the file with google search.

Read More......

I should have blog this earlier...

I should have blog this earlier about every obstacles and steps that have been taken upon my NS-2 experience. I hope now is still not too late yet. I hope to give this blog updated with every problems that I have faced when installing NS-2, running NS-2 and progressing with my research throughout my postgraduate studies.

Besides having this blog as a note to myself, hopefully the contents of the blog can serve as an aid to others who faced the similar problem as me. I have found blog is the most informative way for me to learn the way to start NS-2 and has helped me to solve some of my problem. Therefore, I have decided to write in my blog too to share with people and gained valuable advice from my reader.

Happy reading! That all for a short opening post. ^ ^

Read More......