Actual Coverage Range in NS-2
Actual Coverage Range = square of 2*distInterference_centred in the reception node
PS: Information extracted from mailing list. Hopefully will be useful in later work.
More and more about NS-2
Actual Coverage Range = square of 2*distInterference_centred in the reception node
PS: Information extracted from mailing list. Hopefully will be useful in later work.
Posted by elly | Permalink | | 2 comments
Labels: coverage
Download: Inet Framework
Download: Inetmanet Framework
To install:
You should have a working OMNeT++ installation, version 4.0 or later.
It must be compiled with dynamic NED loading enabled (WITH_NETBUILDER=yes setting).
1. Make sure your OMNeT++ installation works OK (e.g. try running the samples)
and it is in the path (to test, try the command "which nedtool").
2. Change to the INET directory.
3. Type "make" to build the inet executable (debug version). Use "make MODE=release" to build release version.
Problem:
-lpcap is not found
Solution:
yum install libpcap-devel
Problem:
make: warning: Clock skew detected. Your build may be incomplete.
Solution:
   cd directory
# Remove output files
make clean
# Put timestamps on all files equal to current time
find . -exec touch {} \;
# Rebuild all output files
make
Posted by elly | Permalink | | 4 comments
Download the latest NSMIRACLE: Subversion NS-MIRACLE
Download Beta version: NS-MIRACLE 2.0 Beta
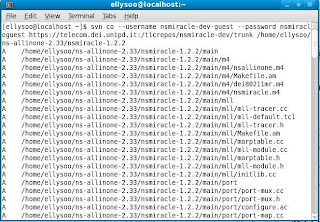
The NS-MIRACLE codebase is kept on a subversion repository. In particular, the development version of nsmiracle is available at this URL:
https://telecom.dei.unipd.it:/tlcrepos/nsmiracle-dev/trunk
The above mentioned subversion repository provides read-only access for guest users using the following account:
username: nsmiracle-dev-guest
password: nsmiracleguest
As an example, using the svn command line client you can check out the latest development version using the guest account by typing the following command and add in the path to be copied to at the trail of the command:

/usr/include/boost/pending/relaxed_heap.hpp:102: error: 'CHAR_BIT' was not declared in this scopeSolution:
Posted by elly | Permalink | | 2 comments
Labels: ns-miracle | subversion
Download: NS-MIRACLE-1.2.2
Download: Paper on NS-MIRACLE-1.2.2

Simulating........................................done!
Packet Error Ratio  :   0.050000
Throughput          :   68360.897567
Tracefile     : /tmp/link_with_errors_cbr.tcl.tr
Posted by elly | Permalink | | 5 comments
Labels: ns-2 | ns-miracle
Download:
Pre-installation:
Install the items in the following list in FEDORA 10. You must be 'root' to execute the following command:
yum install tcl
yum install tcl-devel
yum install tk
yum install tk-devel
yum install blt
yum install gcc
yum install gcc-c++
yum install byacc
yum install bison
yum install flex
yum install make
yum install swig
yum install zlib-devel
yum install java-1.6.0-openjdk-plugin
yum install automake
yum install autoconf
Installation of OMNET++ 4.0:
Download the source package and copy the omnetpp file to where you want to install it.
Extract the package by the command:
tar zxvf omnetpp-4.0rc2-src.tgz
Add the following line to your startup file (.bashrc or .bash_profile):
export PATH=$PATH:~/omnetpp-4.0/bin export LD_LIBRARY_PATH=$LD_LIBRARY_PATH:~/omnetpp-4.0/lib
Access into the newly created directory:
cd omnetpp-4.0
Install with command:
./configure
Locate .bash_profile (eg. /home/user/.bash_profile) and include the following line into it:
export TCL_LIBRARY=/usr/share/tcl8.5
After that, at the omnetpp-4.0 directory too, type this command:
make
After compilation completed, you can try the samples, for eg:
cd ~/omnetpp-4.0/samples/dyna
./dyna
To start omnet++ IDE, use the command:
omnetpp
I am using NS-MIRACLE, the extension of NS-2 in order to create multi technology nodes. My intention is to create nodes with two interfaces, which are UMTS interface and WLAN interface respectively.
For long I have been analyzing the sample codes in NS-MIRACLE, but still I am unable to create my dual interface nodes yet. HELP!~~ @ @
Check your screensaver setting:
system|preferences|look and feel|screensaver|untick all
Check your power management setting:
system|preferences|system|power management|On AC power, set to never for all
Posted by elly | Permalink | | 4 comments
Change by doing the following at FEDORA 10
system| preferences| hardware| screen resolution
and choose your desire resolution, then click "apply" and "ok".
Posted by elly | Permalink | | 0 comments
Download: ns-allinone-2.33
I have used VMWARE with Fedora 10 to install NS-2 for my convenience. The steps are as below:
Pre-installation NS-2:
1. Make sure FEDORA 10 is updated completely at the autoupdate.
2. Have the following install at TERMINAL. You must be the "root" to do this:
yum install autoconf
yum install automake
yum install gcc-c++
yum install libX11-devel
yum install xorg-x11-proto-devel
yum install libXt-devel
yum install libXmu-devel
yum install tk
yum install tcl
yum install make
yum install perl
yum install gnuplot
Installation for NS-2 in FEDORA 10:
1. Unzipped NS-2.33 file:
tar -xvzf ns-allinone-2.33.tar.gz
2. Go into ns-2.33 directory:
cd ns-allinone-2.33
3. Install ns-2.33
./install
4. Set environment:
gedit ~/.bashrc
Replace the following to your .bashrc file, double check your own installation path and version. Set the environment at "cd /home/username" as a user and not the "root":
# .bashrc5. If your environment is set properly, you should be able to run the command "ns" and get the result "%".
# Source global definitions
if [ -f /etc/bashrc ]; then
. /etc/bashrc
fi
# User specific aliases and functions
# LD_LIBRARY_PATH
OTCL_LIB=/home/ellysoo/ns-allinone-2.33/otcl-1.13
NS2_LIB=/home/ellysoo/ns-allinone-2.33/lib
X11_LIB=/ellysoo/X11R6/lib
USR_LOCAL_LIB=/home/ellysoo/lib
export LD_LIBRARY_PATH=$LD_LIBRARY_PATH:$OTCL_LIB:$NS2_LIB:$X11_LIB:$USR_LOCAL_LIB
# TCL_LIBRARY
TCL_LIB=/home/ellysoo/ns-allinone-2.33/tcl8.4.18/library
USR_LIB=/ellysoo/lib
export TCL_LIBRARY=$TCL_LIB:$USR_LIB
# PATH
XGRAPH=/home/ellysoo/ns-allinone-2.33/bin:/home/ellysoo/ns-allinone-2.33/tcl8.4.18/unix:/home/ellysoo/ns-allinone-2.33/tk8.4.18/unix
NS=/home/ellysoo/ns-allinone-2.33/ns-2.33/
NAM=/home/ellysoo/ns-allinone-2.33/nam-1.13/
PATH=$PATH:$XGRAPH:$NS:$NAM
Posted by elly | Permalink | | 0 comments